How to Add a Digital Signature to a Word Document
This article describes digital signatures (also called digital IDs), what they can be used for, and how you can use digital signatures in the following Microsoft Office applications: Word.
Electronic signature is a relatively new process. Instead of the old school "wet signature" you can now use electronic signs, symbols and sounds to authenticate a document.
MS Word unfortunately does not have many built-in features for generating e-signatures. However, Word Processor supports a wide range of extensions and apps that you can use instead. In this article, we will show you how to insert your signature in Microsoft Word and how e-signing works.
In this article
Create a signature line in Word
Your handwritten signatures give your document a personal touch. You can scan your signature and save it as an image to insert into the document.
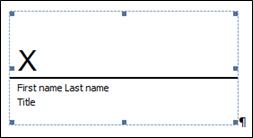
You can also insert a signature line to indicate where a signature should be written.
What is a digital signature?
What does digital signature guarantee?
A digital signature is a seal of approval on electronic, encrypted, digital information such as e-mail messages, macros, or electronic documents. A signature confirms that the information originates from the signatory and has not been altered.
Signing Certificate and Certificate Authority
Signature Certificate To create a digital signature, you must have a signature certificate, which proves identity. When you send a digitally signed macro or document, you also send your certificate and public key. Certificates are issued by the Certification Authority, and like a driver's license, can be revoked. A certificate is usually valid for one year, after which the signatory must obtain a renewal, or obtain a new signature certificate to establish identity.
Certificate Authority (CA) The Certificate Authority is an institution similar to a notary public. It issues digital certificates, signing certificates to verify their authenticity, and indicating which certificates have been revoked or revoked.
Authenticity This is verified by the signatory as a signatory.
- Integrity This content has not been altered or tampered with since it was digitally signed.
- Non-repudiation Proves the authenticity of the signed material to all parties. Denial refers to the act of the signatory who denies any connection with the signed material.
- Notarization Signatures in Word which in certain cases are time-stamped by a secure time-stamp server, have the accuracy of the notarization.
To make these assurances, the content creator must digitally sign the content by using a signature that satisfies the following criteria:
- Digital signature is valid.
- Certificate associated with digital signature is present (not expired).
- The signing person or organization, known as the publisher, is trusted.
- Certificates associated with digital signatures are issued to the signing publisher through a reputable Certification Authority (CA).
Signature lines in Word
The signature line resembles a typical signature placeholder that can appear in a printed document. However, it works differently. When the signature line is inserted in the office file, the author can provide information about the desired signer and instructions for the signer. When an electronic copy of the file is sent to the desired signatory, the person sees a line of signatures and a notification that his or her signature has been requested. The signatory can:
Type a signature, or
Select ink signature image, or
Write the signature using the touch screen PC's inking feature.
When the signer adds a visible representation of the signature to the document, a digital signature is added at the same time to verify the signer's identity.
Create a signature line in Word
In the document or worksheet, place your pointer where you want to draw the signature line.
On the Insert tab, in the Text group, click the Signature Line list, and then click Microsoft Office Signature Line.
In the Signature Setup dialog box, type the information that appears below the signature line:

Sign the signature line in Word or Excel
Suggested signer The signer's full name.
Suggested signer's title Signature Title, if any.
Suggested signer's e-mail address The signer's E-Mail address, if required.
Instructions to the signer Include instructions for the signer, such as "Before signing the document, verify that the content is correct."
- Select one or both of the following check boxes:
Allow the signer to add comments in the Sign dialog box Allow the signer to type a purpose for signing.
Show sign date in signature line The date the document was signed will appear with the signature.
Tip: To add additional signature lines, repeat these steps.
When you sign the signature line, you add your signature and a visual representation of the digital signature.
In the file, right-click on the signature line.
Note: If the file opens in Protected View, click Edit Anyway, if the file is from a reliable source.
From the menu, select Sign.
To add a printed version of your signature, type your name in the box next to the X.
To select an image of your written signature, click Select Image. In the Select Signature Image dialog box, find the file of your signature image file, select the file that you want, and then click Select.
Notes:
For customers using Chinese- (Traditional or Simplified), Korean-, or Japanese-language versions, the Stamp Signature Line option appears.
In addition, you can sign a signature line by double-clicking the signature line. Type your name next to the X. Or, in the Signature Pane, in the Requested Signatures section, click the arrow next to the signature. From the menu, select Sign.
To add a handwritten signature (Tablet PC users only), sign your name in the box next to the X by using the inking feature.
Click on the Sign.
The signature button appears below the document or worksheet.The Signatures button appears at the bottom of the document or worksheet.
The following image shows the Signatures button.

Remove digital signatures from Word
Open the document or worksheet that contains the visible signature you want to remove.
Right-click the signature line.
Click Remove Signature.
Click Yes.
Note: In addition, you can remove a signature by clicking the arrow next to the signature in the Signature Pane. Click Remove Signature.
Invisible digital signatures in Word.
An invisible digital signature, such as a visible digital signature line, ensures the authenticity, integrity, and authenticity of a document. You can add invisible digital signatures to Word documents.
Signed documents will have the Signatures button at the bottom of the document. In addition, for signed documents, signature information appears in the Info section that you see after click the File tab.
Add invisible digital signatures in Word
To protect the authenticity of a document's content, you can add an invisible digital signature. Signed documents have the Signatures button at the bottom of the document.
Click the File tab.
Click Info.
Click Protect Document.
Click Add a Digital Signature.
Read the Word, Excel, or PowerPoint message, and then click OK.
In the Sign dialog box, in the Purpose for signing this document box, type the purpose.
Click Sign.
After a file is digitally signed, the Signatures button appears, and the file becomes read-only to prevent modifications.
Remove invisible digital signatures from Word.
Open the document, worksheet, or presentation that contains the invisible signature you want to remove.
Click the File tab.
Click Info.
Click View Signatures.
The document, worksheet, or presentation view returns, and the Signatures pane appears.
Next to the signature name, click the arrow.
Click Remove Signature.
Click Yes.


0 Comments